Tensors in PyTorch : Part-1
Table of Content
3. Why Tensors? 4. Creating Tensors in PyTorch 5. Tensors Shape in PyTorch 6. Tensors Data Type 7. Explore Tensors in PyTorch
8. Conclusion
Overview of Tensors in PyTorch
In our first blog, we introduced the exciting field of computer vision and discussed why PyTorch is an excellent choice for developing machine learning models. In the second blog, we walked through the steps of setting up a development environment, ensuring your system is ready for hands-on experimentation. Now that we have our system set up, we are ready to dive into the fundamental data structure in PyTorch: Tensors.
What are Tensors?
Tensors are the core data structure used in PyTorch and many other deep learning frameworks. They are generalizations of matrices that can be used to represent data in various dimensions. In simpler terms, a tensor is a container that can store data in n-dimensions array:
-
Scalar (0-D tensor): A single number. For example, 5
-
Vector (1-D tensor): An array of numbers. For example, [1, 2, 3]
-
Matrix (2-D tensor): A 2D array of numbers. For example,[[1, 2], [3, 4]]
-
3-D tensor and higher dimensions: Arrays of numbers with more than two dimensions. For example, a 3-D tensor might look like [[[1, 2], [3, 4]], [[5, 6], [7, 8]]]
Why Tensors?
Tensors are designed to efficiently store and manipulate large amounts of data, making them ideal for the complex calculations involved in deep learning. Here are some key reasons why tensors are crucial:
-
Flexibility and Efficiency: Tensors can represent various types of data, from images and text to time series and more. They are optimized for performance, leveraging hardware acceleration (like GPUs) for faster computations.
-
Interoperability: Tensors can easily be converted between different deep learning frameworks and other numerical libraries, ensuring smooth workflow transitions.
-
Support for Automatic Differentiation: PyTorch’s autograde system uses tensors to automatically compute gradients, which are essential for training neural networks.
Creating Tensors in PyTorch:
The first step is to import the PyTorch module. Additionally, we'll import the math module to facilitate some of the examples:

1. Create empty Tensor:
The simplest way to create a tensor is with tensor.empty()

Let’s break down what we just did
We created a tensor using one of the many factory methods
provided
by the torch module.
The tensor is 2-dimensional, with 3 rows and 4 columns.
The returned object is of type torch.Tensor, which
is
an alias for torch.FloatTensor.
By default, PyTorch tensors are populated with 32-bit
floating
point numbers.
When you print your tensor, you may see random-looking values.

The torch.empty()call allocates memory for the tensor but does not initialize it with any values, so what you are seeing is whatever was in memory at the time of allocation.
2. Initialize Tensor with some value:
Many times you want to initialize your tensor with some value. Common cases are
-
all zeros
-
all ones
-
all random values
torch module provides these functions
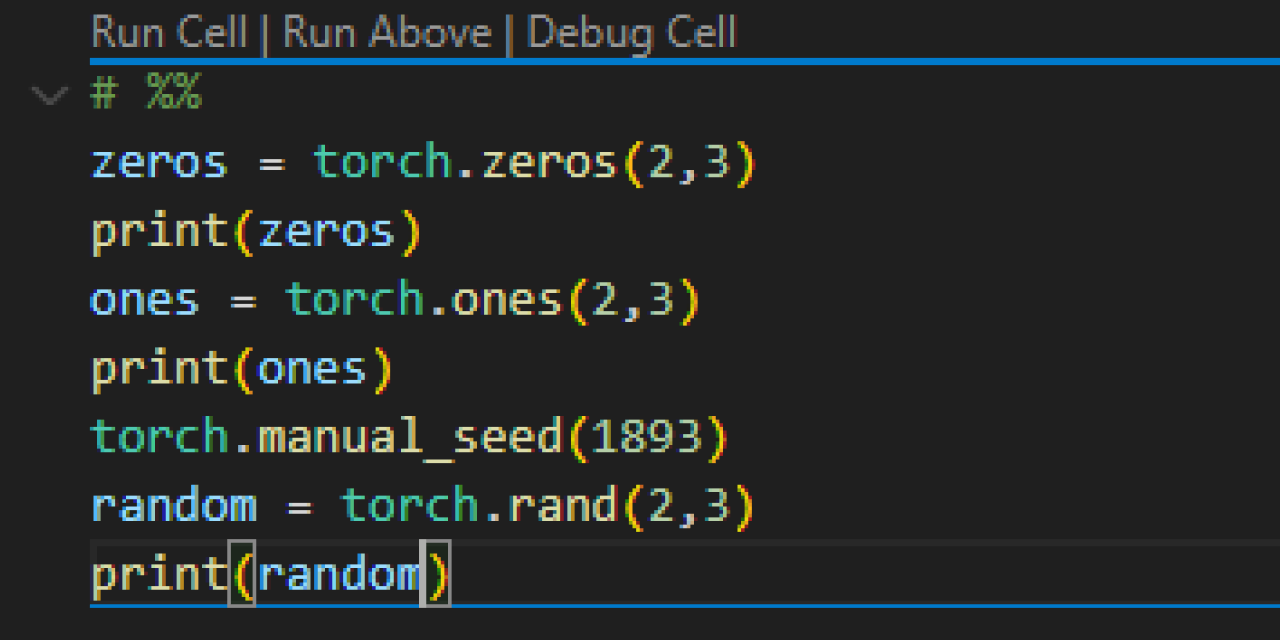
When working with random tensors, you might have noticed the use of torch.manual_seed(). Initializing tensors with random values is a common practice, especially when setting a model's learning weights. However, in research and other scenarios, reproducibility is crucial. Manually setting the random number generator’s (RNG) seed ensures that your results can be replicated. Here's a closer look:
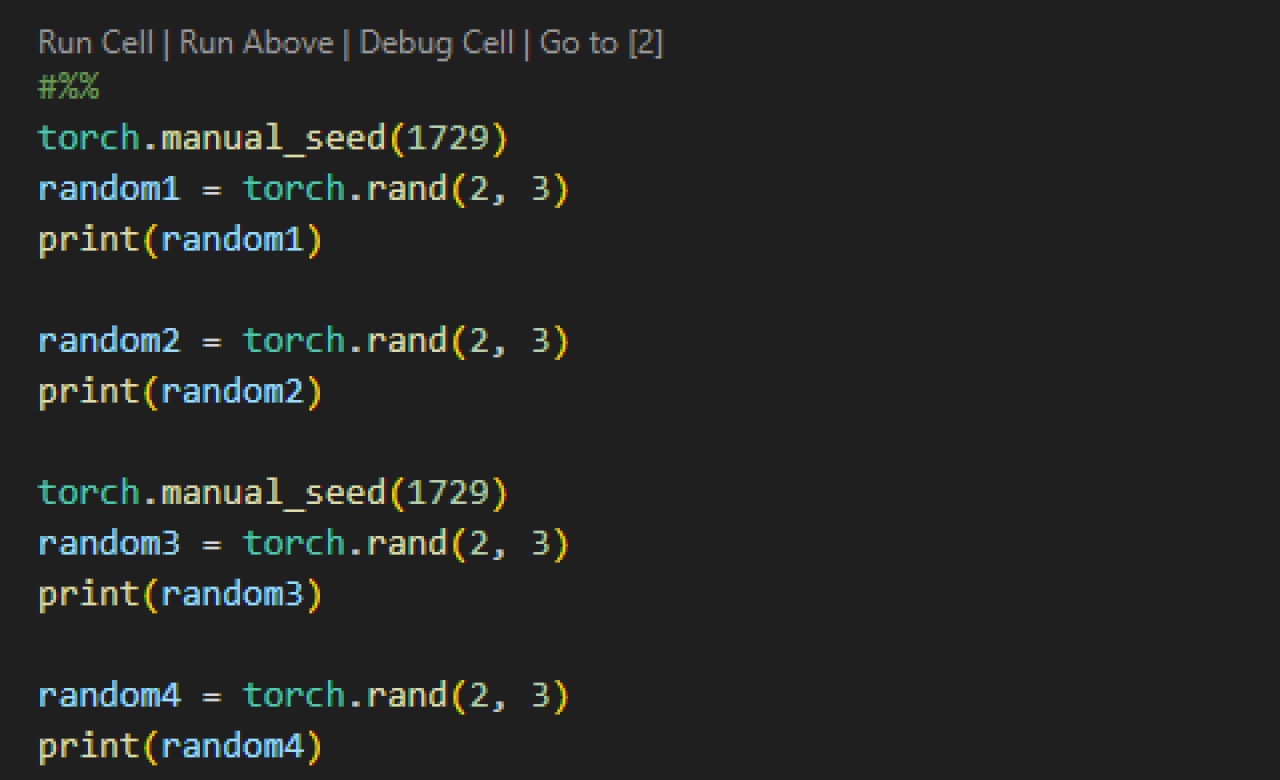
The output is :
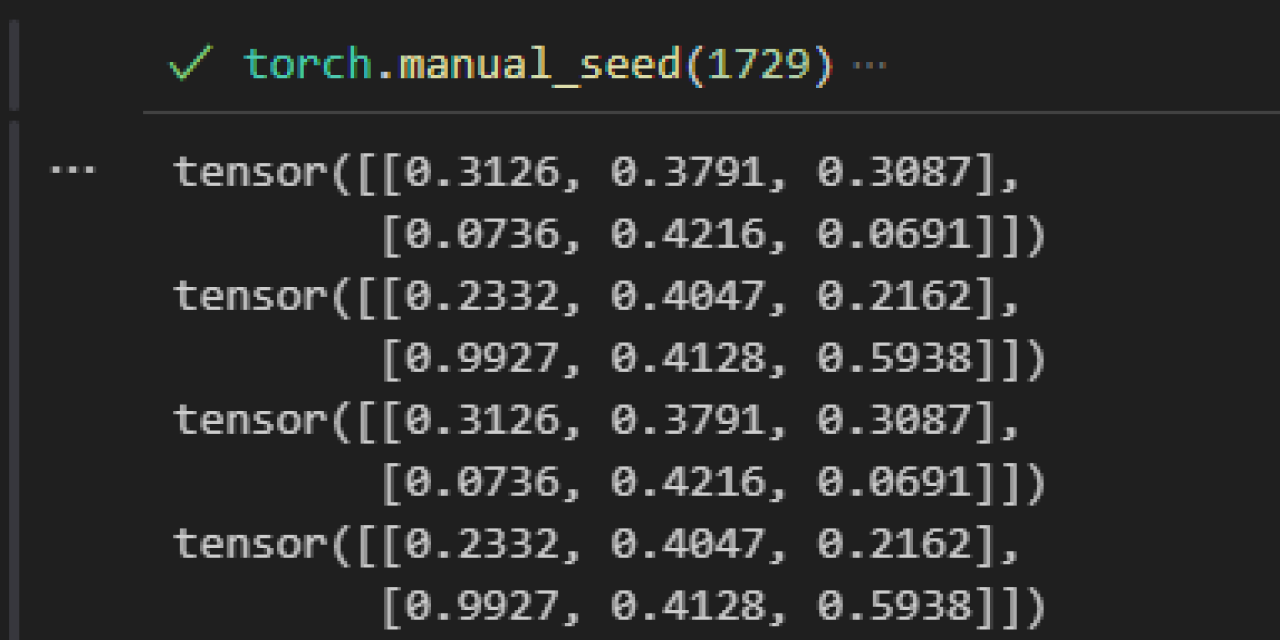
As you can see, random1 and
random3 contain identical values, and so do random2 and random4.
This happens because manually setting the RNG’s seed with
torch.manual_seed(1729) resets it, ensuring that
subsequent computations dependent on random numbers will yield identical results,
thus
ensuring reproducibility.
Tensors Shape in PyTorch:
When performing operations on two or more tensors, it's often necessary for them to have the same shape—that is, the same number of dimensions and the same number of elements in each dimension. PyTorch provides the torch.*_like() methods to help with this:
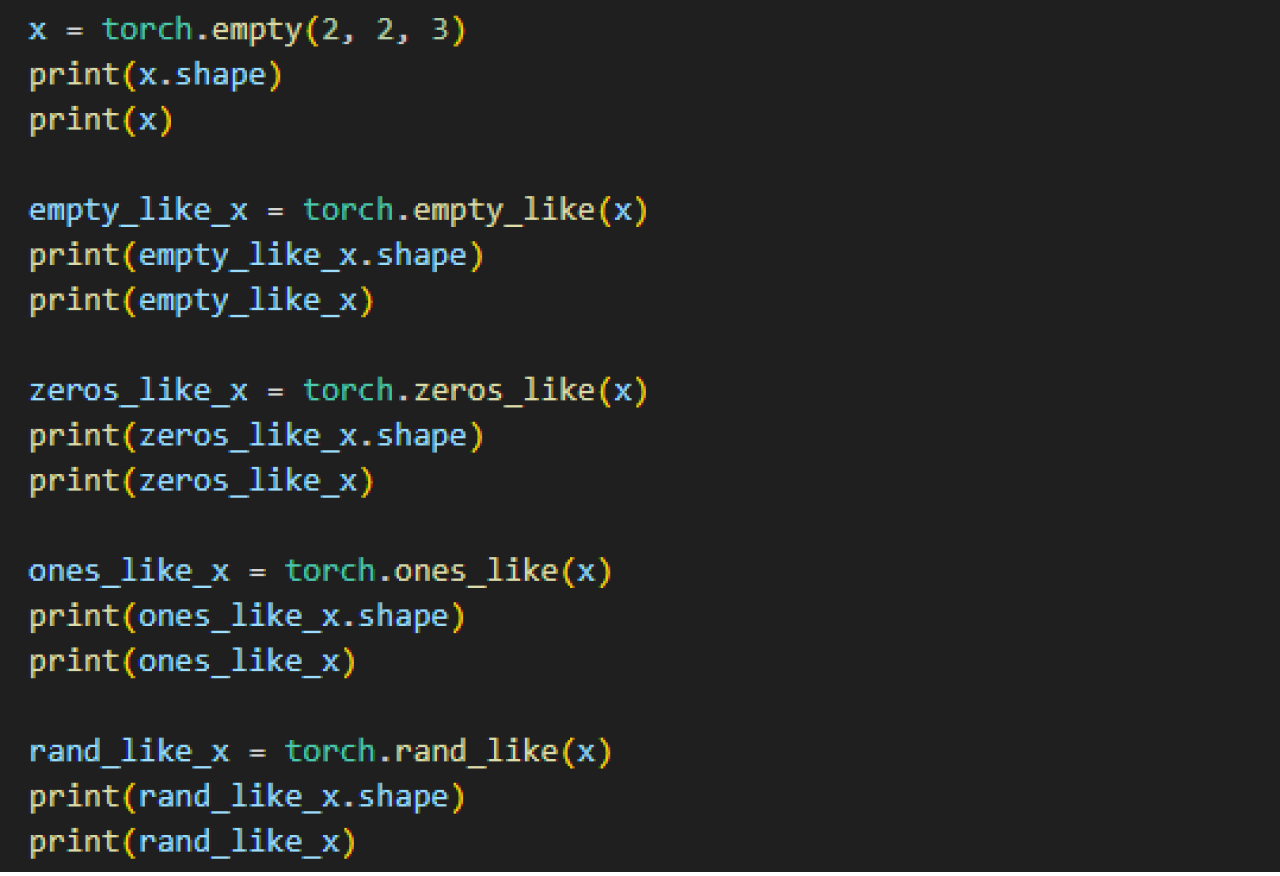
In the code above, the torch.empty(2, 2, 3) call creates a three-dimensional tensor with a shape of 2x2x3. The .shape property of a tensor contains a list representing the size of each dimension. This is useful for verifying the dimensions of tensors.
The methods .empty_like(), .zeros_like(), .ones_like(), and .rand_like() create tensors with the same shape as the original tensor x. Each method returns a tensor of identical dimensionality and extent, but with different initial values.
Another way to create a tensor is to directly use data from a Python collection:

Using torch.tensor() is the most straightforward way to create a tensor if you already have data in a Python tuple or list. Nesting these collections results in a multi-dimensional tensor.
Note: torch.tensor() creates a copy of the data, ensuring that changes to the original data do not affect the tensor and vice versa.
Tensors Data Type:
One of the simplest ways to set the data type of a tensor is by using an optional argument during its creation. For instance, in the first line of the example below, we set dtype=torch.int16 for the tensor a. When we print a, we see it contains 1 instead of 1.0, indicating that it’s an integer type rather than a floating point.

Notice that when printing a, the output explicitly specifies its dtype, unlike when the dtype is left as the default (32-bit floating point).
Another detail to observe is how we specify the tensor’s shape. Instead of listing the dimensions as separate integer arguments, we grouped them in a tuple. While not strictly necessary—PyTorch can infer the shape from a series of integers—using a tuple can make your code more readable, especially when adding optional arguments.
.png)
Another way to set the data type is with the method. In the example above, we first create a random floating point tensor b. We then convert b to a 32-bit integer tensor c using the .to() method. As you can see, c contains the same values as b, but truncated to integers.
By setting the data type either during tensor creation or later with the .to() method, you can ensure your tensors have the appropriate data types for your specific needs. This flexibility is crucial for optimizing performance and compatibility within your deep learning models.
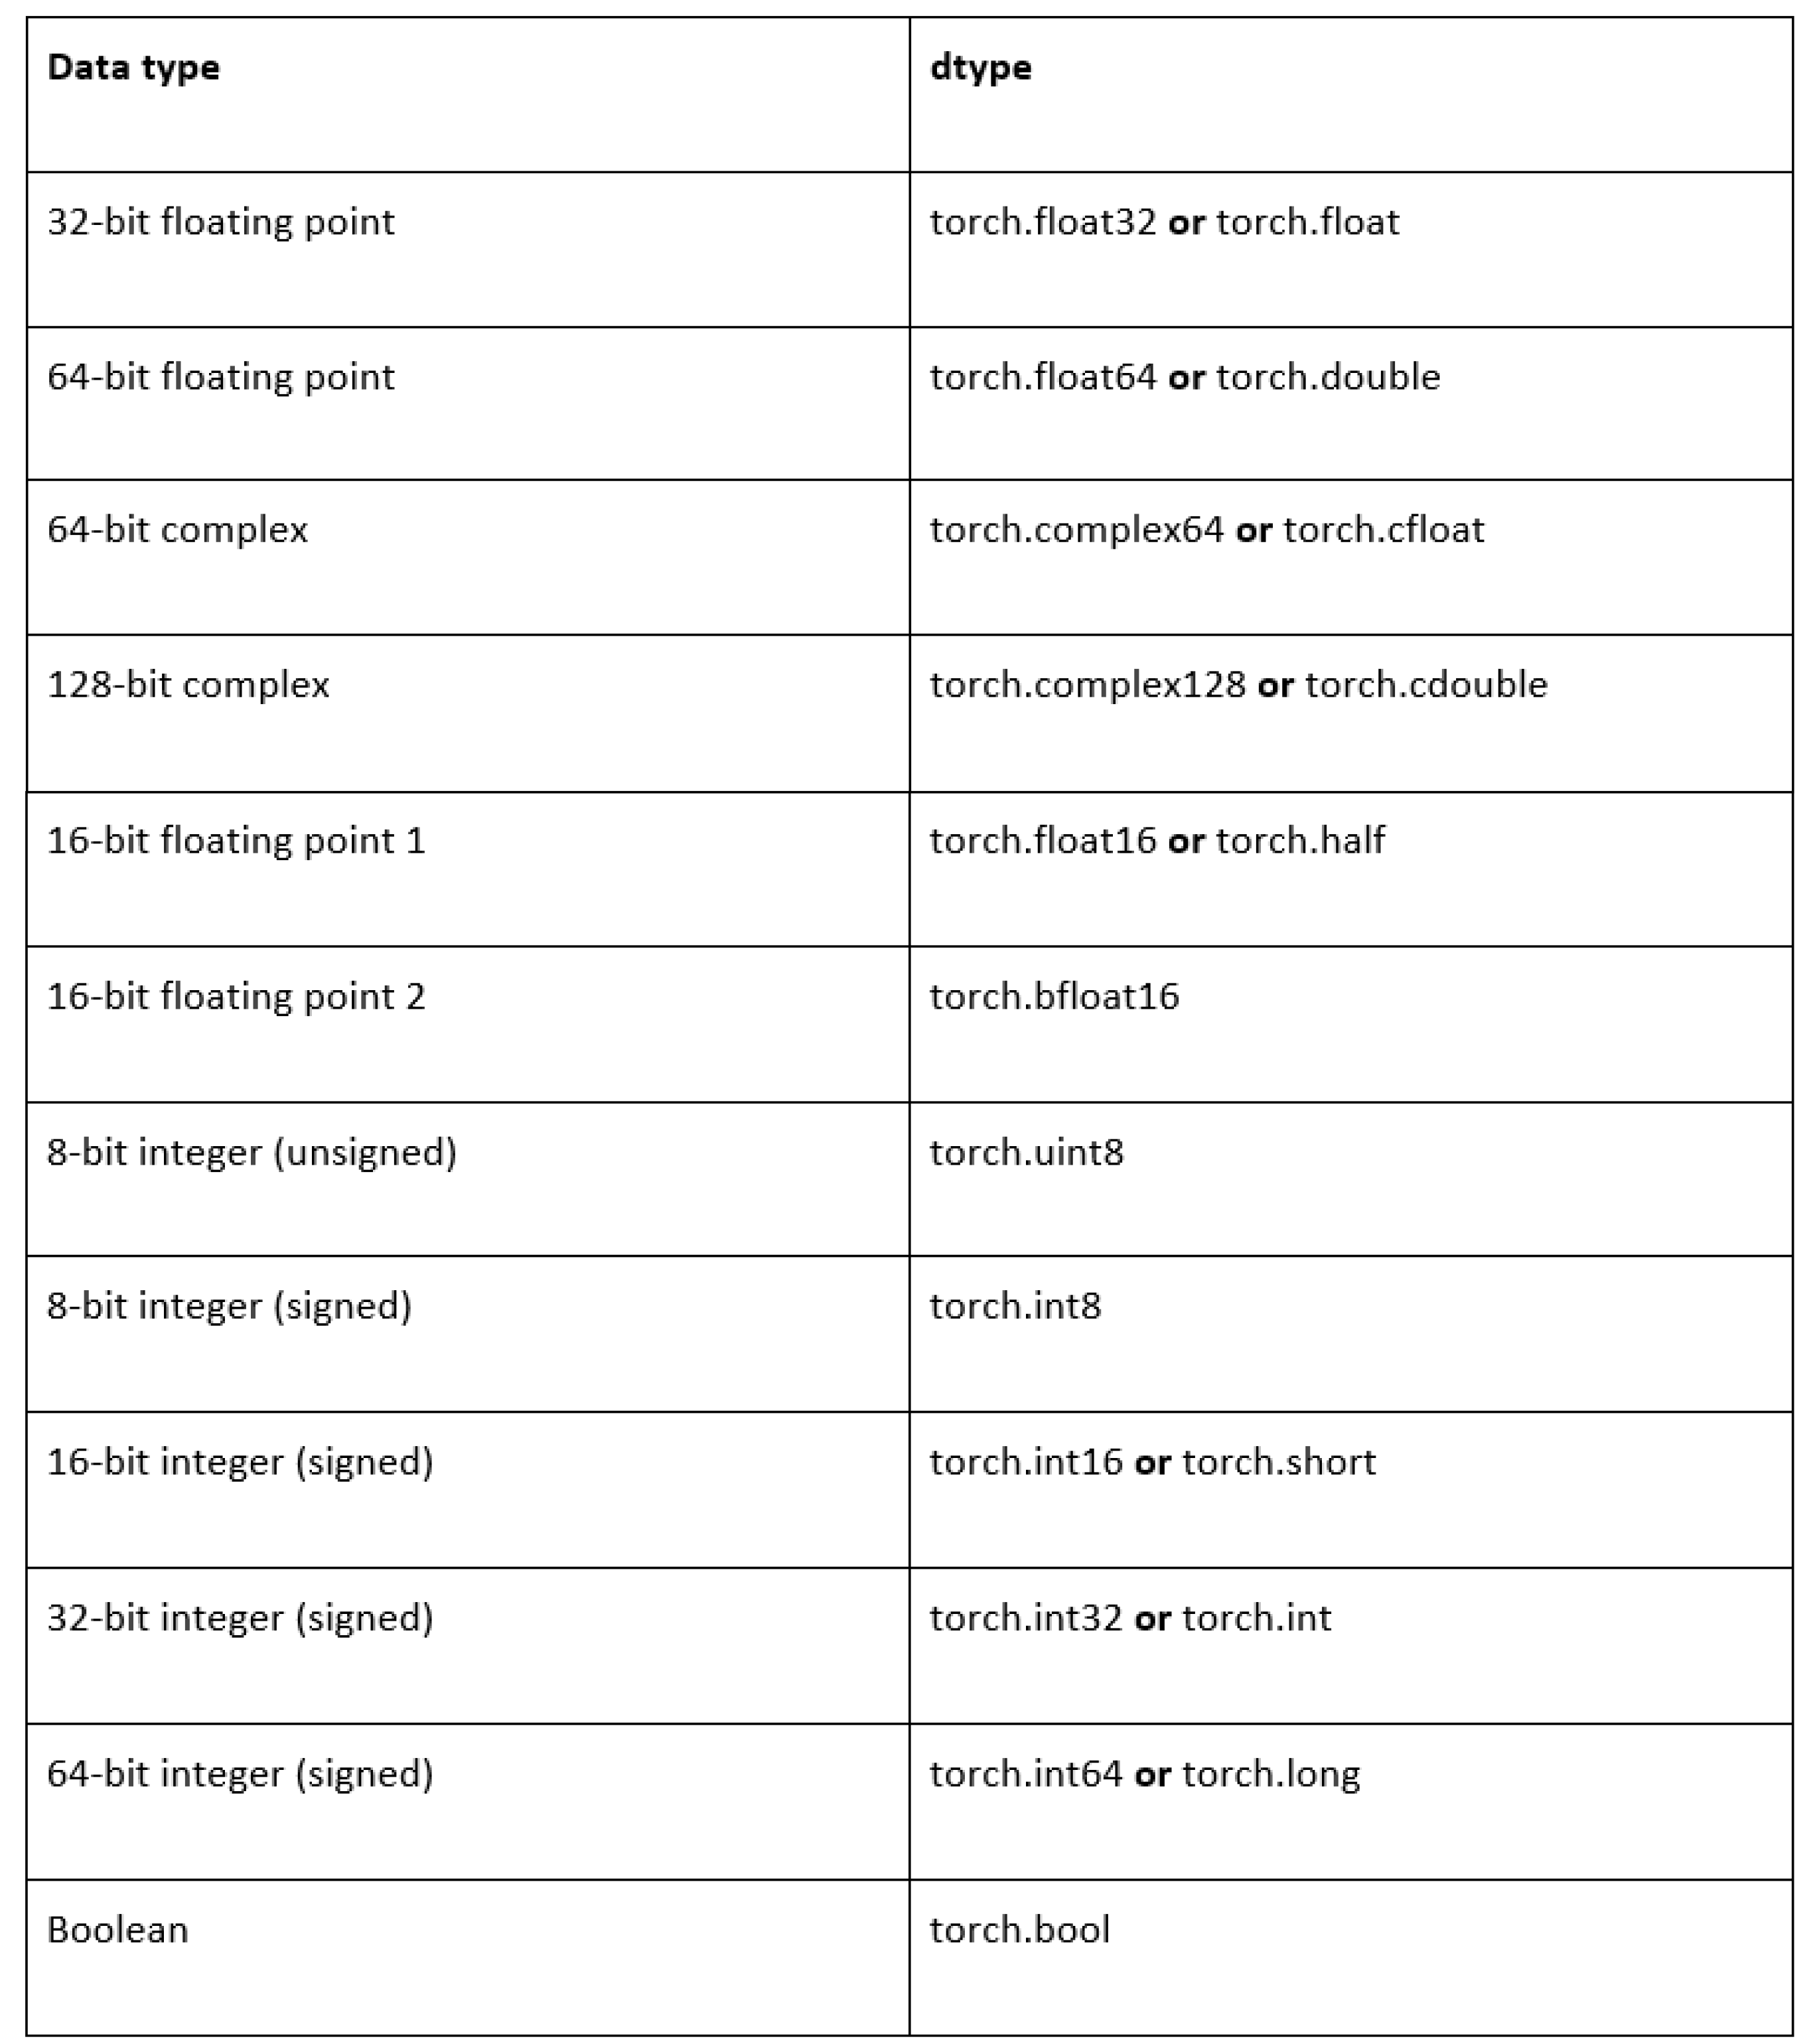
PyTorch has twelve different data types
Explore Tensors in PyTorch:
When you have a tensor and want to know more about it, you can simply print it using print(). However, for large tensors, it's often more practical to check its dimensions and properties.
To check a tensor's shape, you can use the .shape property or the .size() function.
If you want to know the number of dimensions a tensor has, use the .ndim property
Using the len() function on a tensor will only give you the size of the first dimension.
Another important property of a tensor is its data type. In deep learning, floating-point numbers are commonly used, but sometimes you might need integers (e.g., for image pixel values). To check a tensor's data type, use the .dtype property.
If you need to change the data type, you can recreate the tensor with a new type
For example:

By using these properties and functions, you can easily inspect and manipulate tensors to fit your needs in deep learning projects.
Conclusion
Tensors are the fundamental building blocks in PyTorch, offering a versatile way to handle and manipulate data. From understanding basic operations to managing tensor shapes, mastering tensors is crucial for efficient and effective use of PyTorch in your deep learning projects.
Stay tuned for the next installment, where we will start with a practical guide to setting up your first computer vision project with PyTorch in “Understanding Tensors in PyTorch-Part-2"

Written By
Impetus Ai Solutions
Impetus is a pioneer in AI and ML, specializing in developing cutting-edge solutions that drive innovation and efficiency. Our expertise extends to product engineering, warranty management, and building robust cloud infrastructures. We leverage advanced AI and ML techniques to provide state-of-the-art technological and IT-related services, ensuring our clients stay ahead in the digital era.

